
Posted by Edd Mann on Jul 09, 2018
Mince Pie Challenge: Setting up Flow with Babel and Webpack
We have now settled on how our application will perform user authentication.
I now wish to take a step back and help improve upon our code confidence, by-way of adding the static type checker Flow.
In this article I will document the process of configuring Flow with Babel and Webpack, expanding upon our previous example by adding sufficient typing.
Developed by Facebook, Flow adds the ability to provide an incremental type system to your JavaScript application. In doing so we garner the benefits of using a type system - helping catch errors early, improving code readability and enabling better tooling. Facebook provides a well written article on the rationale for developing such a tool, which I highly recommend you read.
Setting up Flow with Babel and Webpack
The first step to configuring Flow within the project is to add the following development dependencies to the package.json.
You should also add the new scripts definition, which will allow us to validate types within the project by simply running npm run flow.
{
  "devDependencies": {
    "babel-preset-flow": "^6.23.0",
    "flow-babel-webpack-plugin": "^1.1.1",
    "flow-bin": "^0.73.0"
  },
  "scripts": {
    "flow": "flow"
  }
}
The JavaScript runtime is unaware of Flow type definitions and would assume them to be simply syntax errors (which is not very helpful). As a result, once validated by Flow, we are required to strip them within Babel’s transpilation process.
With these installed we can now add the Flow preset to our .babelrc, and configure the Webpack plugin within webpack.config.js.
{
  "presets": [["env", { "targets": { "node": "8.10" } }], "flow"]
}
const FlowBabelWebpackPlugin = require('flow-babel-webpack-plugin');

module.exports = {
  // ..
  plugins: [new FlowBabelWebpackPlugin()],
  // ..
};
Adding this Webpack plugin allows Flow to be ran before a build is started. If any issues are highlighted by Flow, you will be alerted and the build will not succeed.
Finally, we need to ensure that we have initialised our Flow configuration (an empty .flowconfig will be generated) and define a new Makefile target which will run Flow for us.
$ docker-compose run --rm serverless npm run flow init
flow:
  docker-compose run --rm serverless npm run flow
With this setup now complete, we can go about slowly incorporating types into our project.
Adding Types to the Project
In the last article we documented a handler abstraction that provided assurances on user authentication and authorisation. We will now go about adding suitable typing to this abstraction, to help improve code clarity and aid in preventing any future bugs.
The first step is to add the following development dependency to the package.json.
This package will allow us to type against the Lambda environment abstractions that are present.
{
  "devDependencies": {
    "flow-aws-lambda": "^1.0.3"
  }
}
With this now installed we will start off by creating a single file within src/types/index.js, were we will define all our custom types.
Here we will make Flow aware that we wish to process this file using the // @flow annotation, and import some of the types that the dependency provides to us.
// @flow

import type { APIGatewayEvent, Context, ProxyResult } from 'flow-aws-lambda';

export type Response = ProxyResult;
We have decided to use a type alias and export the ProxyResult as simply Response.
We can then use this new type within our unauthorised function located in src/helpers/http.js.
// @flow

import type { Response } from '../types';

export const unauthorised = (detail: string): Response => ({
  // ..
});
This now ensures that upon invocation of the function only a string can be supplied, and a Response object will be returned.
We will now move on to document (within src/types/index.js) the structure of how a user token authenticator service should look.
type Token = string;

type UserId = string;

export type UserTokenAuthenticator = Token => Promise<?UserId>;
Again, we are using type aliases to help document the code’s intent - along with defining how the authenticator service function should work (returning an optional UserId encapsulated in a Promise).
We can then employ this type definition within src/services/userTokenAuthenticator.js.
// @flow

import type { UserTokenAuthenticator } from '../types';

export default (poolId: string): UserTokenAuthenticator => async token => {
  // ..
};
With these types in place we will move on to adding type definitions (within src/types/index.js) for the handler abstraction.
type Services = {
  [name: string]: Function,
};

type OptionalUserParameters = {
  event: APIGatewayEvent,
  context: Context,
  services: Services,
  userId?: ?UserId,
};

type AuthenticatedUserParameters = {
  event: APIGatewayEvent,
  context: Context,
  services: Services,
  userId: UserId,
};

type Parameters = OptionalUserParameters | AuthenticatedUserParameters;

type Handler = Parameters => Promise<Response>;

export type HandlerWithServices = Handler => Services => (APIGatewayEvent, Context) => Promise<Response>;

type UserHandlerMiddleware<T: Parameters> = ((T) => Promise<Response>) => Handler;

export type OptionalUserHandlerMiddleware = UserHandlerMiddleware<OptionalUserParameters>;

export type AuthenticatedUserHandlerMiddlware = UserHandlerMiddleware<AuthenticatedUserParameters>;
There are several interesting aspects to this above example.
The first of which is that we lay out the expected structure of the Services object as a map, with string keys and Function values.
Secondly, we define two different Parameters types; ensuring by-way of a union that the supplied value matches one of these structures.
From here, we define how a typical handler is constructed using the createHandler paradigm we have devised.
We then go one step further and define how user middleware should work using a Generic UserHandlerMiddleware type.
Explicitly specifying the desired Parameters structure, we can be certain that any underlying handler that is supplied to the middleware has the necessary userId requirements.
For example, any handler that is supplied to the OptionalUserHandlerMiddleware must be equipped to handle a userId value that is not present.
We can then use these type definitions within the src/helpers/handlers.js implementation.
// @flow

import type {
  HandlerWithServices,
  OptionalUserHandlerMiddleware,
  AuthenticatedUserHandlerMiddlware
} from '../types';

import { unauthorised } from './http';

export const createHandler: HandlerWithServices = handler => services => (event, context) =>
  handler({ event, context, services });

export const withOptionalHttpAuthentication: OptionalUserHandlerMiddleware = handler =>
  async ({ event, context, services }) => {
    const userId = await services.getUserIdFromToken(event.headers.Authorization);
    return handler({ event, context, services, userId });
  };

export const withStrictHttpAuthentication: AuthenticatedUserHandlerMiddlware = handler =>
  async ({ event, context, services }) => {
    const userId = await services.getUserIdFromToken(event.headers.Authorization);
    return userId
      ? handler({ event, context, services, userId })
      : unauthorised('Service requires an authenticated user');
  };
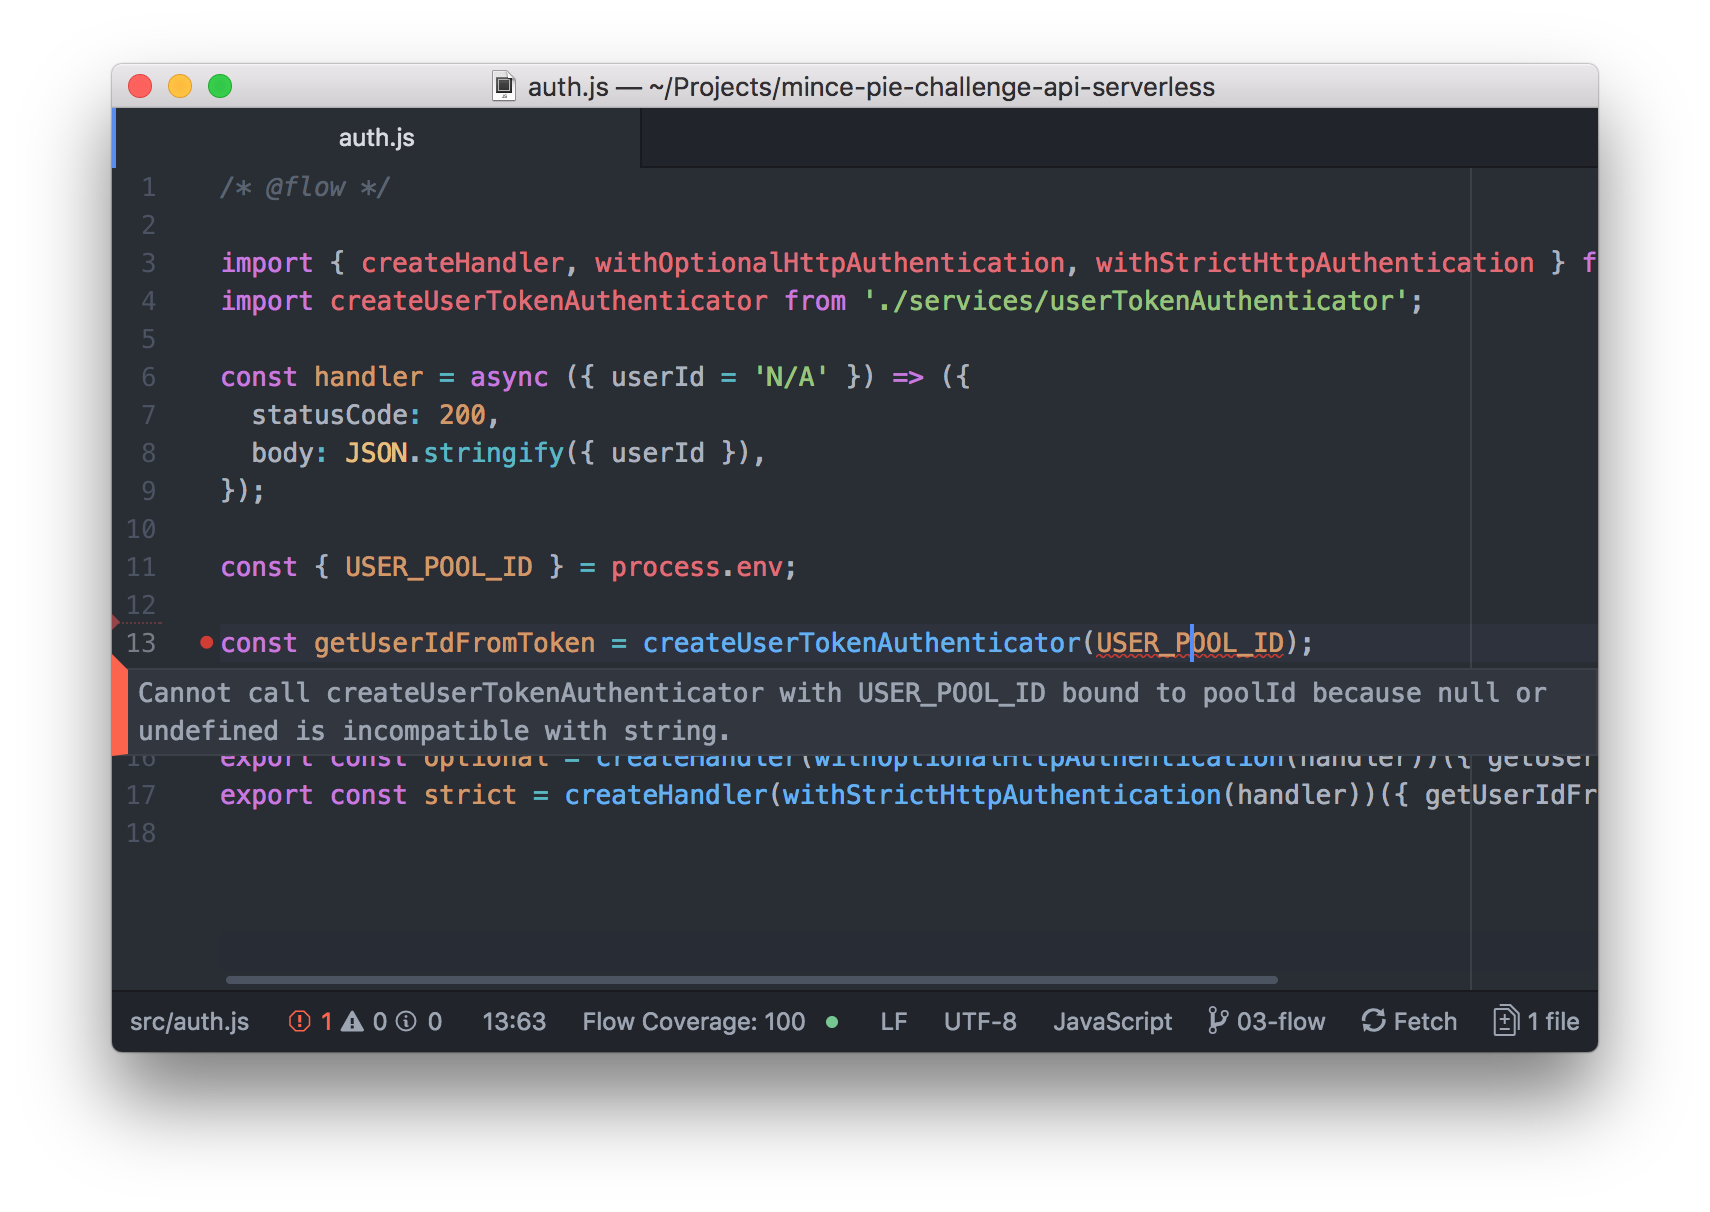
Finally, to ensure that we pass the Flow checks, we must make certain that our src/auth.js handler file caters for the event that the environment variable is not present.
// @flow

const { USER_POOL_ID } = process.env;

if (!USER_POOL_ID) {
  throw new Error('USER_POOL_ID is not present');
}

const getUserIdFromToken = createUserTokenAuthenticator(USER_POOL_ID);
Now if we invoke make flow or attempt a make deploy, we will see that our types get validated by Flow and successfully pass! 🎉
Better Feedback from Flow
Although we are able to run Flow when desired using make flow, I have found it beneficial to gain instant feedback within my editor using a project such as Flow-IDE for Atom.
In doing so we are able to get real-time Flow analysis, which makes it easier to manage the project and introduce typing to the code-base.
With Flow now configured, I wish to increase our code confidence even more so by adding the unit testing framework Jest into the project. Join me in the next post were we will look into testing the application using Jest, and add continuous integration via Travis CI.